Temporarily Defaulting the IP Address
If the currently configured IP address is unknown it can be temporarily set to 192.168.111.222 so that you can connect to the web interface to view and/or change it. This will also temporarily disable HTTPS security, which may help resolve some connection issues.
This defaults the IP address for as long as power is applied, but does not save the change permanently. Once the link is removed and power is cycled to the unit the configured IP address is used.
Defaulting the IP Address of a Two Door Controller
- Remove power to the controller by disconnecting the 12V DC input.
- Wait until the power indicator is off.
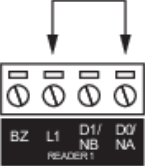
- Connect a wire link between Reader 1 D0 input and Reader 1 L1 output.
- Power up the controller. Wait for the status indicator to begin flashing steadily.
Defaulting the IP Address of a Single Door Controller
- Remove power to the controller by disconnecting the 12V DC input.
- Wait until the power indicator is off.
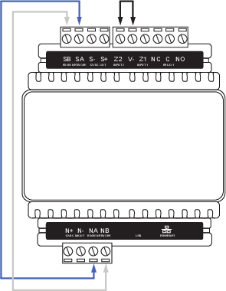
- Connect a wire link between NA of the module network and SA of the reader network, and between NB of the module network and SB of the reader network.
- Connect Input 2 to ground.
- Power up the controller. Wait for the status indicator to begin flashing steadily.
Accessing the Controller
- When the controller starts up it will use the following temporary settings:
- IP Address: 192.168.111.222
- Subnet Mask: 255.255.255.0
- Gateway: 192.168.111.254
- DHCP: Disabled
- Use HTTPS: Disabled
-
Connect to the controller by entering http://192.168.111.222 into the address bar of your web browser, and view or change the IP address and other network settings as required.
Remember to change the subnet of your PC or laptop to match the subnet of the controller.
-
Remove the wire link(s) and power cycle the controller again.
The controller will now use the configured network settings.